
Contents

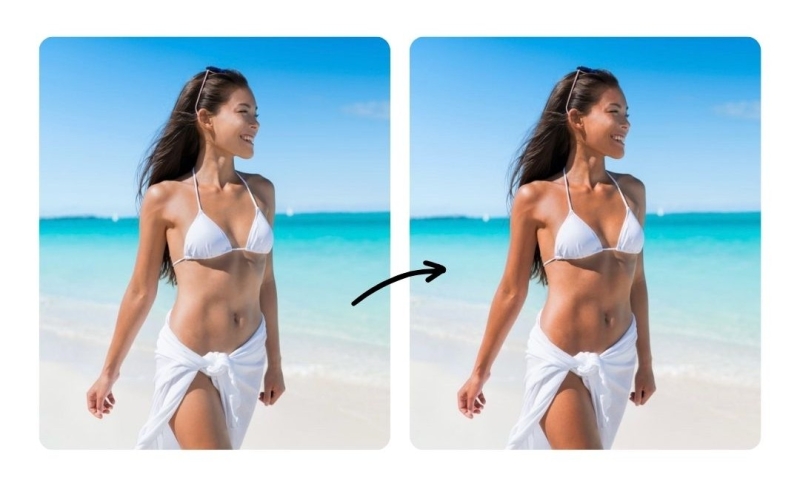
Want to achieve that golden, sun-kissed glow without stepping outside? Whether you’re editing your vacation photos or just want a warmer skin tone for your social posts, a tan filter can instantly enhance your look.
In this guide, we’ll show you how to add a tan filter to your photo, even out tan lines, and choose the best apps for a natural-looking result.

How to Add a Tan Filter to a Photo
Adding a tan filter to your photo is an easy way to enhance your skin tone and create a sun-kissed look without sun damage. Whether you’re going for a subtle glow or a bold bronze, here’s how to do it in just a few steps using PhotoDirector:
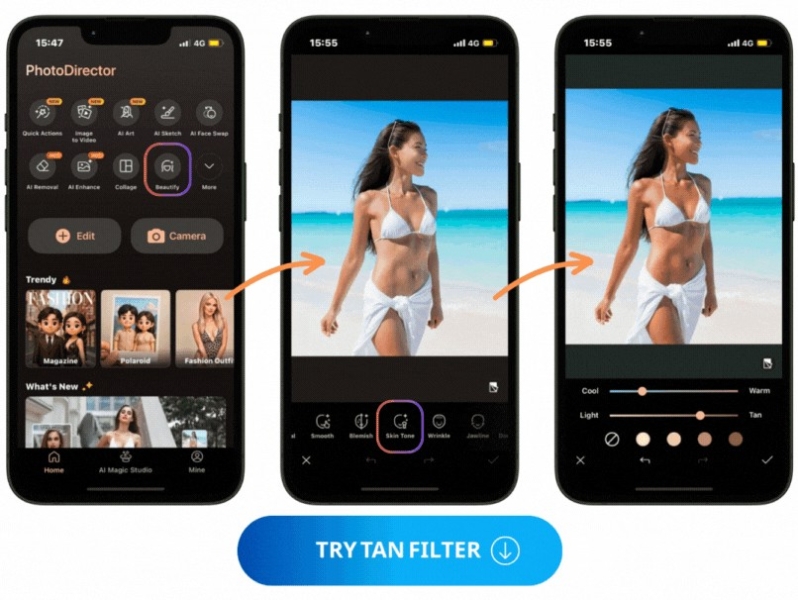
- Open the PhotoDirector app and tap “Beautify”
- Upload a photo and tap “Skin Tones”
- Adjust the color tone and darkness
- Save the result!
How to Even Out Tan Lines in a Photo
Tan lines can sometimes make your skin tone appear uneven in photos, but you can easily fix this with the right editing tools. Follow these simple steps to smooth out tan lines and create a more balanced look:
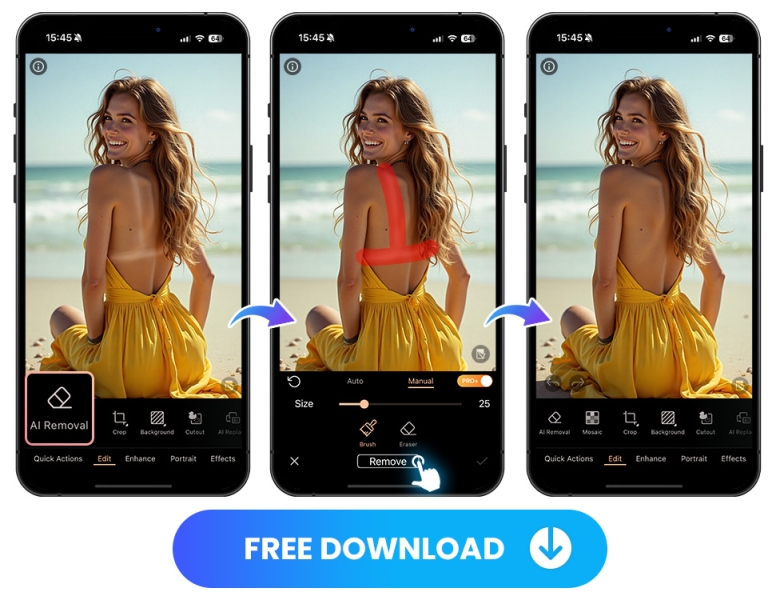
- Open the PhotoDirector app and tap “AI Removal”
- Upload your photo and use the brush to select the uneven area
- Tap “Remove” to generate the result
- Save the result!
Other Tan Tips for Photo Editing
These are tips to help make tan filters look more natural and flattering in your photos:
- Adjust Warmth and Saturation: Boost the warmth slightly for a sun-kissed glow, but avoid over-saturation to keep it realistic.
- Use Even Skin Tone Tools: Apply smoothening or spot-correcting tools to avoid patchiness when darkening skin.
- Balance Background Lighting: A warm tan looks more believable when the background lighting matches—sunset or golden hour effects work well.
- Enhance with Makeup Effects: Add bronzer, highlighter, or subtle blush filters to complete the tanned look.
- Avoid Over-Tanning: Keep the tone close to your natural skin—overdoing it can make the photo look fake or over-edited.
Best App to Apply Tan Filters
When it comes to achieving a natural-looking tan in photos without sun exposure, PhotoDirector stands out as one of the best apps available. It’s packed with AI-powered tools that let you instantly apply a sun-kissed glow, even out uneven skin tones, and remove tan lines with just a few taps.
With PhotoDirector, you can:
- Apply a Tan Filter to get a smooth, darker skin tone instantly.
- Use the AI Removal brush tool to target and fix uneven tan areas.
- Edit the background lighting to make the photo look more natural.
- Use the Makeup tool to apply bronzer or blush and complete the tanned appearance.
Apply Tan Filter
FAQs About Tan Filters
How to get the tan filter?
You can easily get a tan filter by using a photo editing app that offers AI-powered beauty or skin tone adjustment features. With PhotoDirector, for example, you can apply a tan filter in just a few taps:
- Upload your photo
- Select the “Skin Tones” under Beauty tools
- Adjust the depth of the tan using the slider
Who should apply a tan filter?
Anyone who wants a sun-kissed look without sun exposure can benefit from a tan filter. It’s especially great for:
- People with pale or uneven skin tones looking for warmth and radiance
- Social media users aiming for a beach-ready glow in vacation photos
- Models, influencers, or e-commerce users creating summer-themed content
What is the best app to apply a tan filter?
PhotoDirector is one of the best apps for applying a tan filter thanks to its:
- AI Skin Smoothing & Tanning tools – Instantly apply a warm, natural-looking tan to your skin.
- AI Removal brush – Easily remove uneven tan lines for a flawless finish.
- Makeup effects – Add bronzer, blush, and highlighter to enhance the tanned appearance.
- Background editing – Adjust lighting and color tone to make the tan look more natural and well-blended.