
Contents
- 1 What is Portrait Photography?
- 2 Essential Camera Settings for Portraits
- 3 Best Lenses for Portrait Photography
- 4 Natural Light vs Studio Lighting
- 5 Light Modifiers for Portrait Photography
- 6 Standard Lighting Setups for Portrait Photography
- 7 Portrait Composition Techniques
- 8 Posing Tips for Portrait Photography
- 9 Working with Models and Clients
- 10 Best Locations for Portrait Photography
- 11 Editing Portraits: Post-Processing Essentials
- 12 Common Mistakes in Portrait Photography (and How to Avoid Them)
- 13 Advanced Portrait Techniques
- 14 Building a Portrait Photography Portfolio
- 15 Legal and Model Release Basics
- 16 Related Resources and Next Steps

Portrait photography is about capturing a person’s essence through the lens. It’s not just about pointing a camera at someone’s face; it’s about light, composition, connection, and telling their story. The best part is that you don’t need a studio full of expensive gear to take great portraits. Whether you’re working with pro equipment or piecing together a DIY setup in your living room, this guide will walk you through everything you need to know to create timeless portraits.
Portrait Photography: Everything You Need to Know to Master the ArtTable of Contents
- Portrait Photography: Everything You Need to Know to Master the Art
- What is Portrait Photography?
- Portrait Photography Styles
- Essential Camera Settings for Portraits
- Best Lenses for Portrait Photography
- Natural Light vs Studio Lighting
- Natural Light
- Studio (Artificial) Lighting
- Light Modifiers for Portrait Photography
- Umbrellas
- Softboxes
- Beauty Dishes
- Octaboxes
- Reflectors
- Grids
- Snoots
- Strip Lights
- Standard Lighting Setups for Portrait Photography
- Split Lighting
- Broad vs. Short Lighting
- Butterfly Lighting (aka Paramount Lighting)
- Loop Lighting
- Rembrandt Lighting
- Clamshell Lighting
- Portrait Composition Techniques
- Rule of Thirds
- Framing
- Depth
- Negative Space
- Using Foregrounds Creatively
- Posing Tips for Portrait Photography
- Solo Portraits
- Couples, Families & Group Poses
- Working with Models and Clients
- Communication is Key
- Build Confidence, Not Awkwardness
- Set Expectations Early
- Best Locations for Portrait Photography
- Outdoor Natural Locations
- Indoor Setups
- Budget Studio Setup
- Lighting Tips
- Editing Portraits: Post-Processing Essentials
- Lightroom Basics
- Photoshop Basics
- Common Mistakes in Portrait Photography (and How to Avoid Them)
- Poor Focus
- Distracting Backgrounds
- Awkward Posing
- Overediting
- Advanced Portrait Techniques
- High-Key and Low-Key Photography
- Using Colour Gels Creatively
- Fine Art Portraits
- Building a Portrait Photography Portfolio
- Shooting Personal Work
- Choosing Your Best Work
- Website and Instagram Strategies
- Legal and Model Release Basics
- When You Need Releases
- How to Write Simple Model Agreements
- Related Resources and Next Steps
- What is Portrait Photography?
What is Portrait Photography?
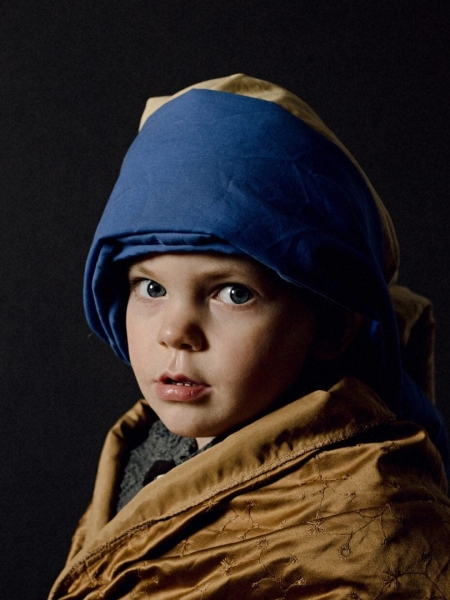
Portraiture is as old as the very first cave paintings. In a literal sense, it’s a drawing (or photograph) of a person. However, we have come to know portraiture from the golden ages of painting when the only means to preserve the image of someone was to commission a painter. The birth of photography continued this tradition, and made portraiture available to more people. In fact, many of the poses and lighting plans we use in portrait photography are inspired by the great portrait artists such as Rembrandt, Vermeer and Velázquez.
Early portrait photographs often look stiff and overly posed to our modern eye, because the nature of the technology at the time needed to use long exposures that needed the subject to sit very still for a relatively long period of time. Historical photos often show some very inventive techniques for keeping small children still for these long exposure portraits, like the hidden mothers photographs, where women would hide under a sheet with the child seated on their lap. Thankfully, things have loosened up since then, and portrait photography has evolved into a diverse and creative field.
Portrait Photography Styles
There are many different styles to explore, each type with its own charm and challenges, and learning the differences is key to developing your own portrait style:
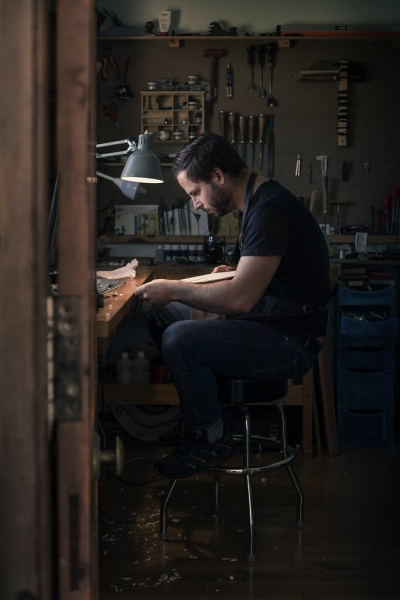
- Environmental portraits place the subject in a meaningful setting, which typically gives clues to the subject’s life or tells more of a story.
- Candid portraits catch people naturally, without posing. This is often common in street photography or during events such as weddings.
- Posed portraits are more traditional and controlled, often taken in a studio setting, though they don’t have to be
- Beauty portraits focus even more closely on the face and styling, it’s often something you see in skin and make-up advertisements.
- Lifestyle portraits aim to capture people in real-life situations with a polished, authentic vibe. Advertising photographers such as Chris Crisman are a great example for shooting eye-catching lifestyle images.
- Fine art portraits lean into creativity, mood, and visual storytelling.

An environmental portrait shows the subject in context and gives more clues about their life or story
[Related Reading: Five Steps to Create Epic Environmental Portraits]
Essential Camera Settings for Portraits
Getting your camera settings dialed in is key to taking a beautiful portrait. Let’s start with the basics:
- Aperture: For those creamy, blurred backgrounds (aka bokeh), use a wide aperture like f/2.8 and focus on the eye closest to the camera. This keeps your subject in sharp focus while softening everything else. This is great for drawing attention right to the eyes. If you’re shooting more fashion portraits or using studio flash then f/8 is a common aperture. However, like with anything, it really depends on what look you’re going for and there’s no right or wrong answer.
- Shutter Speed: Stick with at least 1/125 sec to avoid motion blur, especially if you’re hand-holding your camera. If your subject’s moving or you’re shooting kids or pets, bump it up to 1/250 or faster.
- ISO: Keep it as low as your lighting allows (usually ISO 100–400) to avoid grainy images. If you’re in low light, don’t be afraid to raise it a bit, modern cameras handle noise much better than they used to.
- White Balance: Getting natural skin tones is crucial. Use the custom white balance setting or choose presets like Daylight, Cloudy, or Shade depending on your light source. Avoid Auto WB in mixed lighting, it can change in between shots and can get weird fast.
DIY Portrait Photography Tip
How to Create DIY Light Diffusers Using Household Items
No softbox? No problem. Try taping a white translucent shower curtain, baking paper, or tracing paper over a frame in front of your light source to soften harsh light. It helps soften shadows and gives you that nice, even light that flatters skin tones. Just make sure nothing’s touching a hot bulb!
Best Lenses for Portrait Photography
When it comes to portrait lenses, it’s about what flatters your subject rather than just what you have in your camera bag. You’ll often hear debates about prime vs. zoom lenses, and for good reason. Prime lenses (fixed focal length) like a 50mm or 85mm typically offer sharper images and wider apertures for that dreamy background blur. On the other hand, Zoom lenses give you more flexibility with framing, which is great if you’re moving around a lot or working in tight spaces.
Some classic portrait lens recommendations:
- 50mm (f/1.8 or f/1.4): Often called the “nifty fifty,” this lens is budget-friendly, lightweight, and works beautifully for half-body or full-body portraits. It’s also great for beginners. It’s sharp, fast, lightweight and great value.
- 85mm (f/1.8 or f/1.4): A portrait favourite. It gives a flattering compression and helps isolate your subject from the background, making it ideal for headshots.
- 135mm (f/2 or f/2.8): This lens has more reach and even more compression, perfect for outdoor portraits where you have room to back up. It delivers a very polished, professional look.
- 70-200mm (f/2.8): Another classic to have in your bag, this zoom covers a wide depth of field, is fast for low-light shots, and is usually pin sharp while creating beautiful background bokeh. It’s a staple for wedding photographers and a great option if you’d prefer a zoom lens over a prime.
DIY Portrait Photography Tip
Can’t Buy a New Lens? Try Lens Modifiers or DIY Bokeh Filters!
If upgrading glass isn’t in the budget, get creative. You can tape a DIY bokeh filter (cut fun shapes like hearts or stars into black paper and place it over your lens) for artistic background effects. Or try attaching things like plastic wrap, sunglasses, or even a sandwich bag over the lens for dreamy, experimental vibes. Just don’t block the focus ring!
Natural Light vs Studio Lighting
Lighting is everything in portrait photography. Whether you’re finding available light or setting up strobes, understanding how to work with light helps you shape mood, depth, and definition in your images. The great thing about light is that it obeys the laws of physics and always does the same thing. It doesn’t matter whether it’s coming from a flash or the sun; light is light, and knowing how to shoot both natural light and use strobes will open up your options.
Natural Light
Sunlight is free, beautiful, and incredibly versatile, especially during golden hour, the hour after sunrise or before sunset. This soft, warm light is super flattering for skin tones and adds a dreamy, cinematic quality to portraits. Midday sun can be harsh, but you can soften it by shooting in open shade.
You can also take advantage of natural light from a window and use a couple of reflectors or white foam board to bounce the light back onto your subject. This fills in the shadows a little and subtly reduces the contrast.
Natural light does have a few drawbacks, however. Firstly, if you live in a northern latitude, you won’t have much natural light during the winter past about 3 pm, or on grey rainy days. The light won’t be constant either, so you will have to be aware of cloud cover and the sun moving throughout the day. Generally, a north-facing window is considered the most useful direction to work in because it offers a steadier amount of light throughout the day.
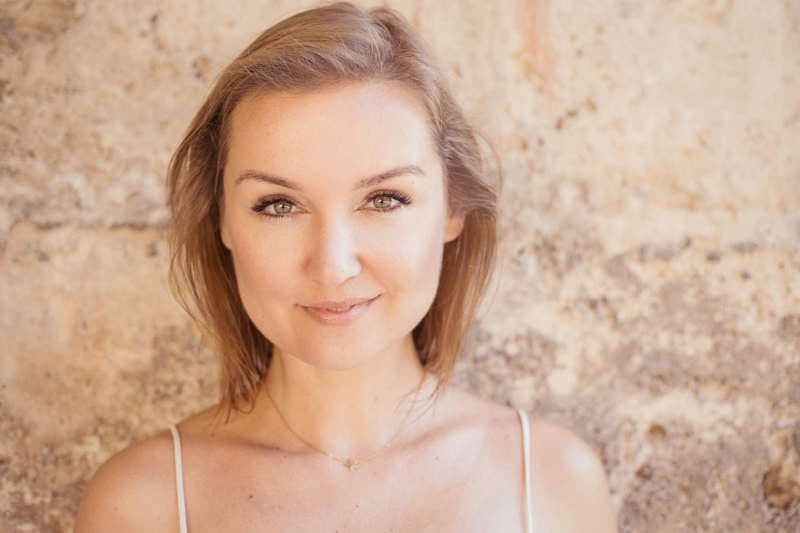
A natural light portrait taken in open shade with a reflector
Studio (Artificial) Lighting
If you want more control, artificial lighting gives you consistency no matter the time of day. Strobes and continuous lights paired with softboxes or umbrellas are common in studio setups. They let you shape light direction and intensity, and create catchlights in the eyes for that polished look. You can use a second light or a reflector to fill in shadows if needed, or use a third light to create separation from the background with a hair light or rim light.
DIY Photography Lighting for Portraits
If you’re just getting started and you aren’t quite ready to splurge on pro lighting gear, you can build a surprisingly effective setup with household items.
DIY Reflectors
Use a white foam board or a large piece of cardboard wrapped in tin foil to bounce light back onto your subject. It helps lift shadows on the face, especially when shooting with strong side light (split lighting).
Homemade Diffusers
To soften harsh light from windows or lamps, try hanging a white shower curtain or baking paper in front of your light source. It diffuses the light, making it gentler and more flattering on the skin. Just make sure you’re not putting anything flammable near a hot bulb. You can also use the middle section of a 5-in-1 reflector as well as a make-shift diffuser.
Bonus Hack
If you’re using a phone flashlight or cheap LED lamp, tape a layer or two of parchment paper or napkin over it to create a soft mini key light. This method is surprisingly effective for close-up portraits!
[Related Reading: https://www.diyphotography.net/level-up-your-portraits-with-these-five-lighting-setups]
Light Modifiers for Portrait Photography
Light modifiers are essential tools in portrait photography because they allow you to shape and control the light. From softening hard light to adding dramatic shadows, here are the most popular light modifiers used in portrait photography:
Umbrellas
Umbrellas are a popular modifier with photographers new to strobes because they are easy to use and very affordable. There are two main types, both of which help eliminate harsh shadows and create even, flattering light for portraits:
- Shoot-through: Shoot-through umbrellas are made of translucent fabric, allowing light to pass through and soften as it spreads out.
- Reflective. Reflective umbrellas bounce the light back toward the subject, creating a broader, softer light source. Both types help eliminate harsh shadows and create even, flattering light for portraits.
Softboxes
Softboxes are a photographer’s go-to for creating soft, even light that flatters most subjects. They work by diffusing light through a fabric or a plastic layer, which softens its intensity and reduces harsh shadows. Softboxes come in various sizes, with larger softboxes producing a softer, more diffused light (ideal for portraits), while smaller ones create a more direct and contrasty light. A softbox can be used for most styles of portraiture, from headshots to full-body shots.
Beauty Dishes
A beauty dish is a shallow, bowl-shaped modifier that creates a unique quality of light, somewhere between soft and hard. It provides a direct light with a soft edge, and often creates more dramatic shadows than a softbox. Beauty dishes are especially popular in fashion and beauty portraiture, as they highlight facial features and add dimension, while still keeping things flattering. Many photographers love the catchlight they create in the eyes.
Beauty dishes are often made of metal and feature a circular disc in the centre that reflects the light back onto the dish area and back onto the subject. The dish is usually either silver or white, with the silver dish creating stronger specular highlights than the white.
Octaboxes
An octaboxThis is why an octabox is the best modifier for portraits is a softbox with an eight-sided design, and it’s a favourite among portrait photographers for its unique shape and even light spread. It creates a very flattering, soft light with subtle gradients of shadow. Octaboxes are particularly useful for headshots and beauty portraits, as they provide more natural, wraparound light that minimises unflattering shadows.
Reflectors
Reflectors are an inexpensive yet essential modifier, especially when you’re shooting outdoors or with limited gear. A reflector works by bouncing light back onto the subject, softening shadows and filling in areas that may be too dark. They come in various colours: white reflects soft, neutral light, silver creates a more contrasty, cooler light, and gold gives a warmer tone, perfect for outdoor or sunset portraits. Reflectors are incredibly versatile. You can use them with natural or artificial light to improve exposure and balance.
Grids
Grids are modifiers that attach to the front of light sources (like softboxes or beauty dishes) to narrow the spread of light and create more directional lighting. They help control light spill, allowing you to focus light on specific areas of the subject or background. Grids are great for dramatic, moody portraits, where you want controlled light that falls off more quickly, or to highlight only certain parts of the subject, like the face or hands.
Snoots
A snoot is a long, cylindrical modifier that focuses light into a narrow beam. It’s ideal for creating spotlight effects, accentuating specific parts of a subject or scene. Use a snoot to light only a small section of your subject’s face or body, adding contrast and drama. It’s a useful modifier for fashion, fine art, or editorial portraiture where you want to isolate the subject and create strong, defined shadows.
Strip Lights
Strip lights are long, narrow softboxes, often used to create narrow bands of soft light. They’re excellent for full-body portraits, or for creating dramatic rim lighting around the subject. The long shape helps to illuminate the subject’s side, while leaving shadows and creating depth. They can be placed either horizontally or vertically, depending on the effect you’re after. They have become synonymous with producing the rim lights in a three-point lighting set-up popular for gritty sports portraits, such as those by Joel Grimes.
Standard Lighting Setups for Portrait Photography
Once you’ve got your lights (or sunlight and a reflector), it’s time to start shaping the look and mood of your portraits. These setups work whether you’re using speedlights, continuous lights, or even just a bright window and a foam board reflector.
Split Lighting
Split lighting is dramatic and bold, and it is sometimes known as side lighting. You place your main light to one side of the subject so that one half of the face is lit and the other is in shadow. It’s a great choice for creating tension, mystery, or showing off strong facial features. Split lighting works best with a single light at roughly a 90-degree angle to the subject.
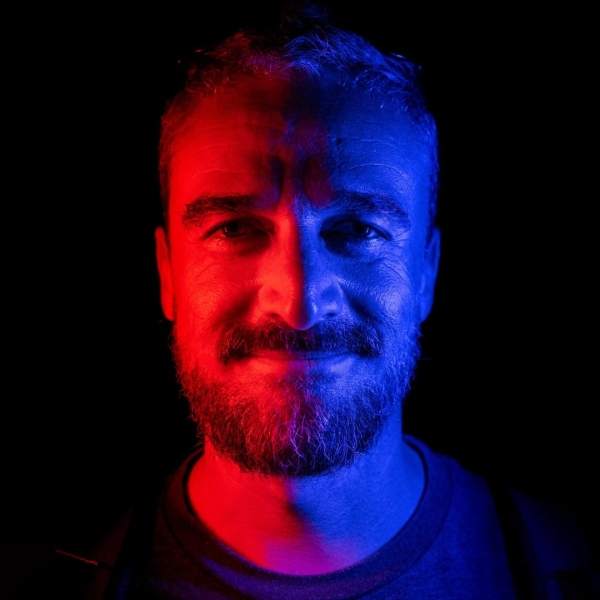
An extreme example of split lighting using coloured led lights
Broad vs. Short Lighting
These are variations based on which side of the face you’re lighting.
- Broad lighting means the side of the face closest to the camera is lit. This can make a face appear wider and is useful for subjects with narrow faces or for creating a more open, friendly feel.
- Short lighting is the opposite: the side of the face farthest from the camera is lit, leaving more shadow on the camera-facing side. It’s slimming and adds depth, perfect for moodier portraits.
Butterfly Lighting (aka Paramount Lighting)
Named for the butterfly-shaped shadow that appears under the nose, this setup is created by placing the light directly in front of and slightly above the subject’s face. It’s classic Hollywood glamour, flattering, clean, and ideal for symmetrical faces, and it tends to bring out the definition of cheekbones. It also works great with a reflector below the face to fill in shadows (see Clamshell lighting).
Butterfly lighting
Loop Lighting
Loop lighting is sort of a halfway between butterfly and Rembrandt lighting. It’s created by positioning the main light slightly to the side and above the subject, at about a 45-degree angle. The light creates a small loop-shaped shadow on the subject’s cheek, just beneath the nose. This shadow is key to the look; it’s small enough to add depth and shape, but not as dramatic as the shadows in split or Rembrandt lighting.
Loop lighting is perfect for adding just the right amount of contrast without making the subject look too harsh. It works especially well for slightly angular faces and is one of the most commonly used lighting styles for headshots.
Loop lighting
Rembrandt Lighting
Rembrandt lighting is a moody, painterly setup named after, you guessed it, the Dutch painter of the same name. To achieve this look, position your light about 45 degrees to the side and slightly above eye level. The key feature is a triangle of light on the cheek opposite the light source, under the eye. It adds drama and depth, and can be especially striking in black and white portraits.
Clamshell Lighting
A soft, beauty-style lighting setup perfect for headshots and fashion. Place one light directly in front and slightly above the subject (like in butterfly lighting), and then use a reflector or second light below the face to bounce light back up. This minimises shadows, smooths skin, and adds lovely catchlights in the eyes.
[Related Reading: Level Up Your Portrait Lighting With these Five Set ups]
Portrait Composition Techniques
Composition is equally as important as lighting in portrait photography. How you frame your subject can add emotion, guide the viewer’s eye, and elevate a simple shot into something striking. Here are some key composition techniques to keep in your creative toolkit:
Rule of Thirds
The rule of thirds is a classic for a reason. Imagine your frame divided into a 3×3 grid.Placing your subject’s eyes or face along those lines or at the intersections creates a more balanced, visually interesting image. It’s especially effective for portraits that include some environment or background elements.
Framing
Use natural or manmade elements like doorways, windows, tree branches, or even someone’s arms to frame your subject within the shot. This technique draws the viewer’s attention straight to the subject and adds a sense of depth and context to your portraits.
Depth
You can create depth and layers by including elements in the foreground, midground, and background. A shallow depth of field (using a wide aperture) blurs the background, helping your subject pop, while keeping just enough detail to tell a story.
Shooting through a doorway can add depth and a different perspective
Negative Space
Negative space is the “empty” area around your subject, and it can be powerful when used intentionally. It helps highlight your subject and can convey feelings like calm, isolation, or scale. Placing your subject off-center with lots of space around them can be minimalist, dramatic, and visually striking.
Using Foregrounds Creatively
Foreground elements don’t just add depth, they can also frame your subject, add colour or texture, or create a voyeuristic “peeking through” effect. Try shooting through plants, fences, sheer fabric, or even glass for a dreamy, layered look.
DIY bonus: hold a translucent object like a plastic bag, CD case, or coloured film in front of the lens for cool light leaks or flares.
These composition tricks are simple to try and can make a huge difference in how your portraits feel and connect with viewers. Don’t be afraid to break the rules once you’ve learned them, some of the best portraits come from creative experimentation.
[Related Reading: Portrait Composition Tips]
Posing Tips for Portrait Photography
Learning a few poses in advance can really help reduce the stress before a shoot. It’s especially helpful if you’re photographing ‘normal’ people who aren’t used to being in front of the lens. If you start with a few poses you can boost confidence and the rest of the session will often become more natural and relaxed.
It’s sometimes good to think about posing more as a guide than a rigid set of rules. The purpose is to direct your subject into a natural position that looks good in the camera. Here are a few important things to remember:
Solo Portraits
- Watch the hands: Hands can be tricky. Avoid stiff arms or “T Rex hands” by giving them something to do: tuck them in pockets, play with jewellery, cross the arms loosely, or gently touch the face or neck.
- Use angles: Turn the subject’s body slightly away from the camera, and have them look back over their shoulder or angle their face slightly. This adds dimension and flatters facial structure.
- Chin forward, then down: This minor adjustment helps define the jawline and avoids the dreaded double chin.
- Relax the posture: shoulders down, neck long, weight on one foot to create a more natural, less rigid look.
Couples, Families & Group Poses
- Get close: Physical connection is key. Have couples lean in, touch foreheads, or hold hands. For families, stack them by height or arrange them in triangle formations for balance.
- Vary levels: Use chairs, stairs, or even people kneeling or sitting to mix up heights in a group. It adds interest and makes it easier to fit everyone into the frame without awkward gaps.
- Watch the hands (again): In groups, avoid “orphan hands” (random hands with no visible body). Make sure all limbs feel connected and purposeful.
- Stagger heads: Avoid having everyone’s heads lined up perfectly. Slightly offsetting them makes the group feel more natural and dynamic.
- Think in 3s or 5s: For very large groups, it can be easier to group people in smaller groups of 3, 4 or 5 people and then add individuals to create a balanced but interesting group composition that doesn’t look too ‘school photo’. Photographers such as Annie Leibovitz have perfected this relaxed group composition.
DIY Portrait Photography Tip:
DIY Posing Guides: How to Build Posing Cards and Cheat Sheets at Home
Save your go-to poses by printing out example shots or sketches onto index cards or a small photo book. Use apps like Pinterest or Canva to gather ideas, and sort them by category (solo, couples, kids, groups). Keep them in your bag or phone for on-the-spot inspiration. You can even laminate them for durability. It’s a simple, low-cost way to feel confident and keep sessions flowing smoothly, especially when you’re drawing a blank in the middle of a shoot.
[Related Reading: How to Pose and Direct Portrait Subjects]
Working with Models and Clients
It doesn’t matter whether you’re working with a professional model or a ‘normal’ person, you still need to learn how to direct and interact with your subject. Building trust, giving direction, and creating a comfortable vibe will help you capture natural, confident portraits every time.
Communication is Key
Start talking before you even pick up the camera. Explain your process, the style you’re going for, and what they can expect. During the shoot, don’t leave your subject guessing; give clear, gentle direction and encouragement. Tell them when something looks good (“Yes, hold that!”) or if you want to tweak a pose (“Let’s try turning your shoulder a bit more”).
Even a quick “You’re doing great” goes a long way toward helping someone relax. Being a portrait photographer isn’t just about the gear or lighting, it’s about people skills. If your subject leaves the shoot saying, “That was actually fun,” you’ve done your job right.
Build Confidence, Not Awkwardness
Most people feel a bit self-conscious being photographed, especially if they don’t know what to do with their hands (everyone asks). Help them ease into it with light conversation and warm-up shots with no pressure, just test frames.
Compliment real things: good posture, expressive eyes, a great laugh. Avoid vague praise like “That’s great” on repeat; make it personal and specific. If someone feels good, they look good. Confidence always shows up in the photos.
Set Expectations Early
Before the shoot, discuss what they’re hoping for: looks, mood, location, even wardrobe. Talk about how long the session will be, what kind of direction you’ll be giving, and how/when they’ll receive their photos. This keeps things professional, minimises stress, and ensures everyone’s on the same page.
If you’re working with a model on a TFP (trade-for-photos) basis, be crystal clear about deliverables and usage rights. Don’t let there be any surprises later.
Best Locations for Portrait Photography
Where you shoot a portrait plays a huge role in its overall feel. The right location sets the mood, complements your subject, and helps tell a story. But honestly, there is no ‘best location’ for a portrait, you could literally take a photo inside a dumpster and it could still be amazing! However, here are a few more conventional location ideas:
Outdoor Natural Locations
Outdoor portraits have a timeless charm and are super accessible. Look for places with interesting textures, leading lines, or natural frames. You can also make use of natural reflectors such as light coloured walls or floors:
- Parks, gardens, or forest trails
- Beaches or lakesides at golden hour
- Urban backstreets with brick walls or graffiti
- Open fields with tall grass or wildflowers
Pay attention to light quality and direction: shade from a tree, a cloudy sky, or shooting during golden hour can give you soft, flattering light. Always scout locations ahead of time so you’re not scrambling on shoot day.
Indoor Setups
Indoor portraits offer more control (and a weather-proof plan B). You can shoot in:
- Living rooms with large windows
- Minimalist bedrooms or home offices
- Cafés, studios, or coworking spaces with natural light
- Historic buildings (check if you need permission)
Use curtains, blinds, or reflectors to control harsh light. Look for simple, uncluttered backgrounds, or create your own with fabric or paper rolls.
DIY Portrait Studio at Home
You don’t need a commercial studio to shoot great portraits. You can build a simple, effective home studio for under $200 with a little creativity and some smart gear choices.
Budget Studio Setup
- Backdrops: Use plain walls, bedsheets, curtains, or budget-friendly backdrop stands and muslin cloths (~$30–$50). Or paint some foam-core with wall paint.
- Lighting: Pick up a couple of softbox lights or continuous LED panels online (around $40–$60 each). If you can’t afford lights yet use large windows diffused with a sheer white fabric curtain and bounce the light with foam boards.
- Reflectors: Grab a 5-in-1 reflector (~$20), or make your own with tin foil, poster board, or a car windshield reflector.
Lighting Tips
- For a soft key light, place your light (or window) at a 45-degree angle to your subject’s face.
- Use a white poster board or foam core as a fill light on the opposite side.
- Try clamshell lighting using one soft light above and a DIY reflector below to create a beautifully lit headshot.
Editing Portraits: Post-Processing Essentials
While getting it right in camera is a great thing to aim for, post-processing can add that extra layer of polish to your portraits. Editing helps fine-tune colour, tone, and detail to make your subject look their best. Here’s a quick guide to the essentials in two of the most popular editing tools: Lightroom and Photoshop.
Lightroom Basics
Lightroom is perfect for batch editing and overall photo enhancement. Start by adjusting:
- Exposure and contrast to balance light and shadow.
- White balance to ensure skin tones look natural and flattering.
- Colour grading using the HSL (Hue, Saturation, Luminance) sliders to subtly enhance or correct skin tones, lips, and eyes.
- Use the Spot Removal tool for small blemishes or distractions.
- Apply masks and filters to control light in specific parts of the image.
- Finish by sharpening details and reducing noise for a crisp, clean look.
Photoshop Basics
Photoshop allows for more detailed retouching, perfect for portraits that need extra polish or advanced skin editing.
- Use the Healing Brush and Clone Stamp tools to remove blemishes, stray hairs, or imperfections.
- The Dodge and Burn technique helps sculpt facial features by selectively brightening or darkening areas.
- Use Frequency Separation (more advanced) to smooth skin texture without losing natural detail.
- Apply Sharpening selectively to eyes, lips, and hair.
DIY Photography Tip
Top Free or Budget Editing Tools for DIY Photographers
Not ready to invest in Adobe’s Creative Cloud? No worries! Here are some great free or affordable alternatives:
- Darktable: A powerful, open-source Lightroom alternative with advanced editing features.
- GIMP: A free Photoshop-like program great for detailed retouching and compositing.
- Luminar AI: Affordable, user-friendly, and packed with AI-powered portrait enhancements.
- Snapseed: Mobile-friendly, free app with excellent retouching and filter options.
- Canva Pro: While more graphic design-focused, it has basic photo editing tools perfect for quick fixes.
- Affinity Photo: It’s not free, but it still has an inexpensive pay-once model and definitely gives Photoshop a run for its money.
Common Mistakes in Portrait Photography (and How to Avoid Them)
Even the best photographers slip up sometimes, but knowing the usual pitfalls can save you time and frustration. Here are some of the most common portrait mistakes, and simple ways to dodge them.
Poor Focus
Nothing kills a portrait faster than blurry eyes. Always focus on the subject’s eyes, as Shakespeare so rightly said, they really are the window to the soul! Use single-point autofocus and double-check focus before shooting. When shooting wide apertures (like f/1.8 or wider), depth of field is razor-thin, so focus accuracy is crucial. You can also take advantage of modern cameras’ advanced auto eye-focus systems, which are pretty impressive and can take a lot of the stress out of shooting at shallow depths of field.
Distracting Backgrounds
A cluttered or busy background can pull attention away from your subject. Scout your location beforehand, and if necessary, use a wide aperture to blur backgrounds effectively. When indoors, clear or simplify the scene behind your subject, or use seamless backdrops to keep the focus on the person.
Awkward Posing
Stiff, unnatural poses make portraits feel forced and uncomfortable. Help your subjects relax by encouraging movement, giving clear but gentle directions, and avoiding overly rigid stances. Using natural angles and comfortable hand placements goes a long way toward capturing genuine expressions.
Overediting
It’s tempting to smooth every wrinkle and tweak every colour, but too much editing can make your portraits look fake or plastic. Aim for natural enhancements and retain skin texture and personality. Remember, less is often more when it comes to retouching. A good rule of thumb is to help your subject look like they’ve had a great night’s sleep rather than knocking off ten years!
Advanced Portrait Techniques
Once you’ve mastered the basics, it’s time to experiment with creative lighting and styles that really make your portraits stand out. Try these advanced techniques to inspire your next shoots:
High-Key and Low-Key Photography
- High-Key portraits are bright, airy, and mostly free of shadows. They use lots of light, often multiple light sources and reflectors, to create a clean, uplifting mood. Think fashion editorials or cheerful lifestyle shots.
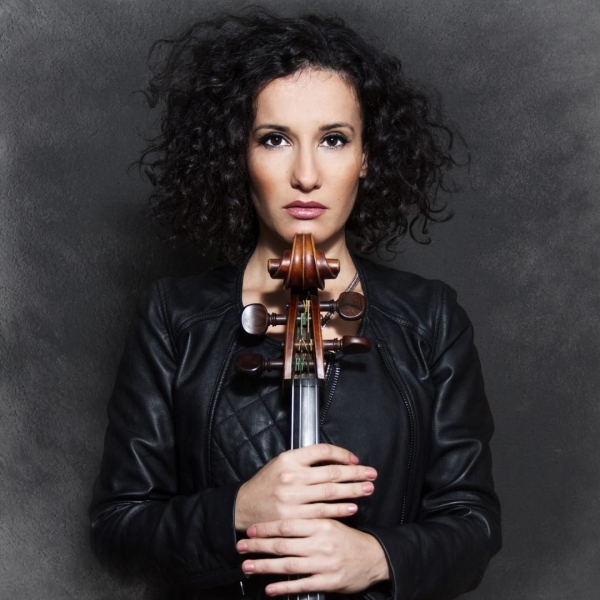
- Low-Key portraits, on the other hand, rely on deep shadows and limited light to create drama and mystery. They often use a single light source placed strategically for contrast, perfect for moody, artistic portraits.
High-key portrait

More of a low-key style of portrait using just window light on the subject
Using Colour Gels Creatively
Colour gels are colored filters you place over your lights. They open up endless creative possibilities, you can add a splash of red for passion, blue for calm, or green for a surreal vibe. Try mixing gels on multiple lights to create vibrant backgrounds or dramatic colored shadows on your subject’s face. Jake Hicks is an absolute master at creating gelled portraits.
Fine Art Portraits
Fine art portraits push beyond simple documentation into the realm of storytelling and emotion. These often involve conceptual themes, dramatic lighting, and carefully planned composition. Think painterly, moody, or abstract, where the portrait becomes an artwork that evokes feeling rather than just capturing appearance. Photographers like Bella Kotak embody this style of portrait.
Building a Portrait Photography Portfolio
A strong portfolio is your best calling card because it shows off your style, skills, and what clients can expect from you. But getting started can feel daunting, especially if you’re new or building a business from scratch. Here’s how to build a portfolio that opens doors:
Shooting Personal Work
Some people get weird about shooting for free, but if you approach it from the point of view of developing your portfolio or exploring subjects and projects that are personal to you, it can be a great way to build a portfolio quickly.
Don’t be afraid to shoot TFP (trade-for-photos) or offer free sessions to friends, family, or local models when you’re just starting out. It’s a great way to practice, experiment with lighting and poses, and build a variety of images. Just be sure to clearly agree on deliverables and usage rights upfront to avoid confusion later, and make sure it’s useful for you, if you’re doing what the subject wants and not what you need, it’s a job, not a portfolio build.
Choosing Your Best Work
Quality beats quantity every time. Select images that showcase your strongest lighting, composition, and posing skills. Aim for variety in style and subject, but make sure every photo fits your overall vision. Your portfolio should tell a cohesive story about who you are as a photographer.
If you’re overwhelmed by choice then printing out your photos and laying them out on the floor can be a great way to make the selection and determine the best order.
Website and Instagram Strategies
- Website: Keep it clean and simple with easy navigation. Feature your best images prominently on the homepage, add an “About” section, and include client testimonials if possible. Use clear contact info so visitors can reach you easily.
- Instagram: Post regularly with engaging captions and behind-the-scenes shots. Use relevant hashtags to reach your audience and engage with your followers by replying to comments and messages. Stories and reels are great for showing your personality and process.
DIY Photography Tip
DIY Portfolio-Building Tips: Free Website Builders and Using Canva for Online Portfolios
- Try free platforms like Pixieset, Wix, Weebly, or Google Sites to create a simple, professional website without coding.
- Use Canva to design clean portfolio layouts, mood boards, or highlight reels you can share online or print as leave-behinds.
- Combine these tools to craft a polished online presence that showcases your work and your unique style, all on a tight budget!
Legal and Model Release Basics
No matter how great your photos are, clear legal agreements are essential to protect you and your clients. It doesn’t need to be complicated or scary, model releases are often enough, and they help to make sure everyone’s on the same page about how images can be used.
When You Need Releases
You’ll need a model release anytime you plan to use a person’s likeness commercially, like for marketing, advertising, or selling your photos on stock sites. You’ll also need one if you’re shooting for. abrand and using people as models. Even if you’re shooting portraits just for fun or portfolio use, it’s smart to get releases to avoid headaches later, especially with paying clients or models. For children, always get a release signed by a parent or guardian.
How to Write Simple Model Agreements
Keep your model releases clear, concise, and easy to understand. They should include:
- Names and contact info of both the photographer and model
- Description of the shoot and images covered
- Permissions granted (where and how photos can be used)
- Any compensation or usage terms (if applicable)
- Signatures and date
Avoid legal jargon; straightforward language helps everyone feel comfortable.
You can often find examples of a basic model release via an online search (just make sure it’s relevant to your location for legal reasons), or you can use an app such as Easy Release that takes the headache out of model releases and keeps everything in a digital format.
Related Resources and Next Steps
Portrait photography is a rewarding journey that blends technical know-how, creative vision, and a whole lot of people skills. From mastering your camera settings and lighting setups to guiding your subjects with confidence and building a standout portfolio, each step brings you closer to capturing portraits that truly resonate.
Remember, the key to success is practice. Don’t be afraid to experiment, make mistakes, and learn along the way. Whether you’re shooting with professional gear or a DIY setup, every session is a chance to grow.
If you’re ready to dive in deeper, then explore our collection of DIY photography tutorials for more tips, tricks, and creative ideas to help you become the portrait photographer you want to be:
How to Create Spectacular Brenizer Method Portraits
https://www.diyphotography.net/want-to-be-a-better-portrait-photographer-get-in-front-of-somebody-elses-lens/
https://www.diyphotography.net/this-is-what-a-portrait-looks-like-at-every-aperture/
https://www.diyphotography.net/five-common-portrait-mistakes-and-how-you-can-fix-them/
https://www.diyphotography.net/how-to-master-backlight-in-portrait-photography/