Contents
Portrait photography is an art of endless possibilities, and one technique that has captivated photographers’ imagination is the Brenizer Method. This method is named after wedding photographer Ryan Brenizer. The Brenizer technique creates a unique, otherworldly look by stitching together multiple images to mimic the effect of a medium-format camera.
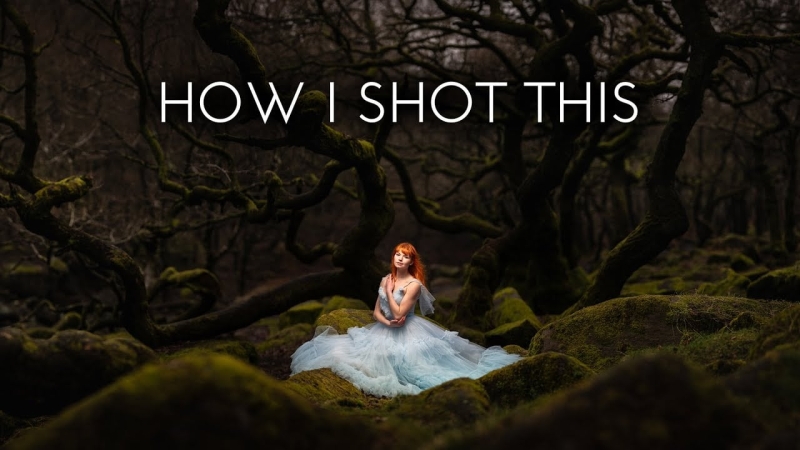
In this video, photographer Neil Redfern shows how he used this method to create a breathtaking portrait of his friend Darcy in the chilly setting of Padley Gorge, UK. Here’s a breakdown of his process, along with a few practical tips.
What is the Brenizer Method?
The Brenizer Method involves taking multiple photos of a scene and stitching them together in post-production to create a single image with a shallow depth of field and a wide field of view. The result is a portrait that looks like it was shot with an extremely wide aperture, giving it a dreamy, cinematic quality.
Key Considerations for the Brenizer Method
Neil highlights four crucial points to keep in mind when using this technique:
- Stay Still: Once you’ve set your composition, don’t move. While you’ll be moving the camera to capture different parts of the scene, your position should remain fixed to ensure consistency.
- Manual Settings: Set your camera to manual mode to ensure that the exposure, aperture, and shutter speed remain consistent across all shots. Any variation can make it difficult for editing software to stitch the images seamlessly.
- Static Scene: The scene you’re photographing should be static. Movement in the frame can cause issues when stitching the images together.
- Long Focal Length: Use a long focal length, ideally a prime lens, to achieve the best results. Neil used an 85mm f/1.4 lens for his shoot, which allowed him to create a wide aperture effect.
Equipment and Setup
Neil’s setup included a Sony A9 II camera paired with an 85mm f/1.4 lens. He also used off-camera flash, specifically a Godox AD200 inside a MagBox Pro 24, triggered by a Godox X3 trigger. This setup allowed him to control the flash power effortlessly, even in low-light conditions.
Camera Settings
For this shoot, Neil used the following settings:
- Shutter Speed: 1/250s (to kill ambient light)
- Aperture: f/1.4 (to achieve a shallow depth of field)
- ISO: 100 (to maintain image quality)
He emphasized the importance of keeping these settings consistent across all shots to ensure a smooth stitching process.
The Shooting Process
Neil’s approach involved capturing multiple frames around his subject, Darcy. Here’s how he did it:
- Start with the Subject: The first shot should include the entire subject. This ensures that if the subject moves or leaves the scene, you still have a complete image to work with.
- Capture Surrounding Frames: After photographing the subject, Neil moved the camera to capture overlapping frames around the scene. He took several shots to the left, right, top, and bottom, ensuring there was enough overlap for the software to stitch the images together.
- Avoid Overshooting: Neil admitted that he initially overshot, taking more frames than necessary. He later realized that fewer frames (e.g., three to the left, three to the right, and one in the middle) would suffice for a seamless panorama.
Post-Processing in Lightroom
Once the shots were taken, Neil imported them into Lightroom for stitching. Here’s his step-by-step process:
- Select Images: Choose the main shot of the subject and all the surrounding frames.
- Photo Merge: Go to Photo > Photo Merge > Panorama. Neil preferred the “Spherical” option for stitching.
- Crop and Edit: After merging, crop the image to remove any white edges. Neil used a 16:9 aspect ratio for a cinematic look.
- Fine-tune: Adjust highlights, shadows, and colours to enhance the final image. Neil used radial filters to draw attention to Darcy and applied a vignette to add depth.
Practical Tips for Photographers
- Use Back Button Focus: To avoid refocusing between shots, use back button focus or switch to manual focus after the initial shot.
- Overlap Frames: Ensure there’s a 20-30% overlap between frames to help the software stitch them together.
- Shoot in RAW: This gives you more flexibility in post-processing, especially when dealing with high-contrast scenes.
- Experiment with Angles: Try different angles and compositions to see what works best for your subject and location.
Final Thoughts
The Brenizer Method is a powerful technique that can transform ordinary portraits into extraordinary works of art. While it requires patience and precision, the results are well worth the effort. Have a look at the video below:

